
Salesforce Commerce Cloud (SFCC) Integration
This article will guide you through SFCC integration with Zinrelo.
Zinrelo is implementing a new version of this integration and we recommend that you wait for it to be available. Please contact your customer success manager at [email protected] for more details.
Introduction
Zinrelo has a certified extension for Salesforce Commerce Cloud (SFCC) which makes the Zinrelo installation for SFCC Clients a very simple process. This document describes the process. We suggest that you connect with your Zinrelo Customer Success Manager (CSM) to discuss how they can help with the installation process.
Plugin-integrated features

The detailed view is mentioned here.
Set up process
Setting up Zinrelo on your SFCC storefront is a 4 step process
- Sign up with Zinrelo
- Set up the cartridge
- Set up the points information message on the product pages
- Set up rewards in Zinrelo
Step 1: Sign up for an account on Zinrelo
Disclaimer: _If your customer success manager has already set up the account for you, you can directly login to your account at https://app.zinrelo.com/store/login
-
To setup Zinrelo module on your SFCC store, you will need to sign-up for a Zinrelo account and complete the basic setup if you haven't already - https://app.zinrelo.com/store/signup
-
During the basic setup, you can set up loyalty activities and rewards. If you are unsure of the rewards or don’t have coupon code information handy, you can skip the Rewards setup step or add some dummy coupon codes and revisit it later.
-
At the end of this setup, you will land on the home page of Zinrelo Admin Dashboard.
If you encounter any issues or have any questions during the setup, please reach out to Zinrelo support at [email protected].
-
On the home page, on the left side navigation panel, go to General > Settings. Make a note of your Partner ID and API-Key. You will need this in the next step after you install the Zinrelo module on your Miva Merchant store.
-
Also, on the same General > Settings page, enter the Sign-Up URL and Login URL for your stores in the Store Sign Up URL and Store Login URL fields and scroll down to save.
Step 2: Set up Zinrelo SFRA Cartridge on SFCC
2.1 Deploy the cartridge
-
The Zinrelo Loyalty Rewards Cartridge can be downloaded from the Commerce Cloud marketplace.
-
Please ensure that you have your Salesforce Commerce Cloud project setup done before importing Zinrelo’s Cartridge.
-
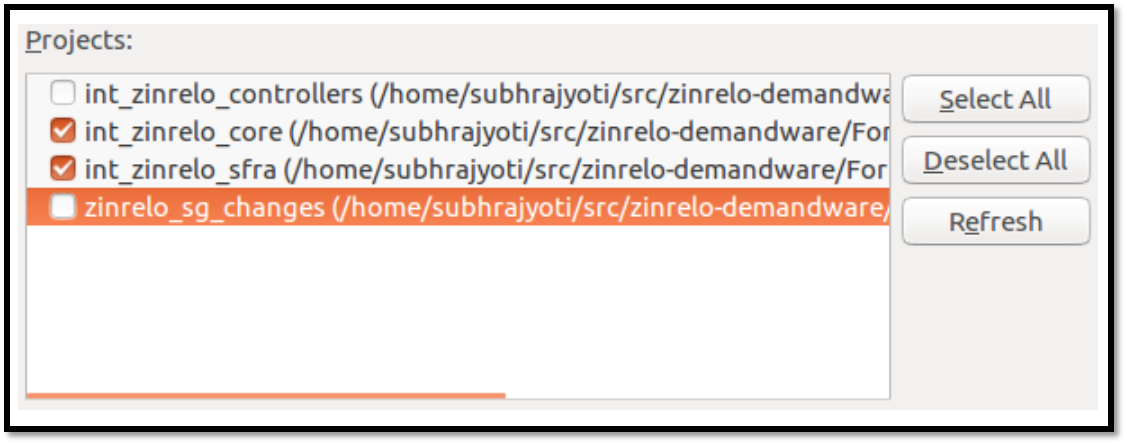
Import the cartridge folders to your project. Following is an image of the folders you need to import into your project folder.
2.2 Configure Cartridge Path
-
Once the uploading of the cartridge is completed, login to Business Manager (BM) and go to Administration > Sites > Manage Site
-
First, select the Storefront - Site and then click on the “Settings” Tab.
-
In the Storefront settings, type “int_zinrelo_sfra:int_zinrelo_core:” in the front of the cartridge path.
-
Once it is configured the name of the cartridge will appear in the “Effective Cartridge Path” and will be ready for use.
Important Note: Please ensure that the “int_zinrelo_sfra:int_zinrelo_core:” is added at the front of the list.
2.3 Import Metadata
-
All import files can be found in the metadata folder within the cartridge installation pack. To import all necessary Zinrelo settings, log in to the Business Manager, and navigate to Administration -> Site import & export -> Import & Export. Now upload the zinrelo.zip file using the upload button and, finally go back and use the import button to import the file.
-
Now Go to Merchant Tools > Site Preferences > Custom Preferences. Choose “Zinrelo Configs” from the list of custom preferences and click on it.
-
Fill the PartnerID and API Key that you must have procured in the first step when you signed up for Zinrelo. If you wish to award loyalty points when the order is shipped, select “Order Shipped” as the Loyalty Order Status else select “Order Placed”. Click Apply.
2.4 Verify Jobs and Services Setup
- Once the metadata is imported, the following jobs will be created:
ProcessAllShippedOrders - This job runs every 5 minutes and will check if any recent order has been marked as Shipped. If the Points award condition in Zinrelo settings has been selected as “Order Shipped”, then the job will pick up recently shipped orders and award points for those purchases to the users. If you wish to test this job, you will have to run this job manually.
ProcessAllCancelledOrders - This job runs every 5 minutes and will check if any recent order has been marked as Cancelled. If the job gets any such orders, then the job will pick up recent canceled orders and deduct points for those canceled purchases. If you wish to test this job, you will have to run this job manually.
Verify that the jobs are created by going to Administration > Operations > Jobs
- The following services will also be created:
zinrelo.http.loyaltyPointsAward.post - This service is to award points whenever a customer places an order.
zinrelo.http.loyaltyPointsReturn.post - This service is to deduct points whenever a customer cancels or returns an order.
Verify that the services mentioned above have been created by going to Administration > Operations > Services
Step 3: Set up the points information message on the product pages
3.1 Add the points message to the product pages
-
Go to app_storefront_base/cartridge/templates/default/product/productDetails.isml
-
Comment out the following line of code
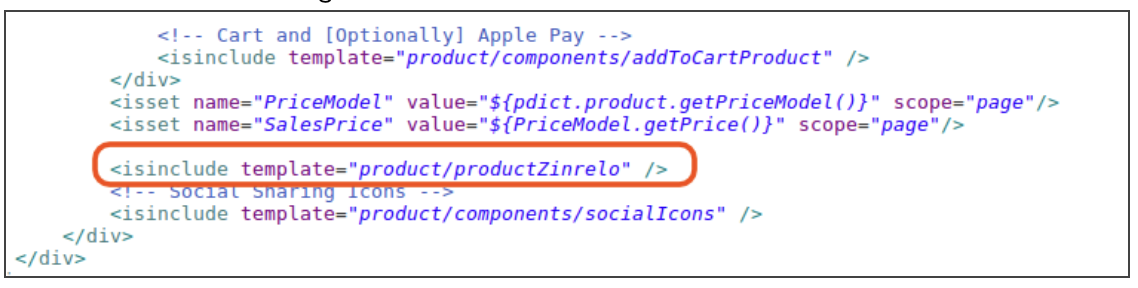
- Add the following line just below the commented line:
<div> You will earn <span data-zrl-product-points></span> points for purchasing this product </div>
Set up product identifier JavaScript for product pages
- Copy the below JavaScript snippet
zrl_mi.price_identifier = function(){

if(typeof sf_product_price != "undefined" && typeof sf_product_category != "undefined" && typeof sf_product_id != "undefined"){

price =sf_product_price.substring(sf_product_price.indexOf(" ")+1);

category = sf_product_category;product_id = sf_product_id;};

var product={};

if(typeof price != 'undefined'){

is_pdp=true;product['price'] = price;

};

if(typeof product_id != 'undefined'){

product['product_id'] = product_id;

};

if(typeof category != 'undefined'){

product['category'] = category;

}

return product;

}
- Go to Zinrelo Admin Console. From the left navigation panel, go to Onsite Notifications > Product Display Pages.
- Click on product display pages and scroll down to see a text area for “JavaScript Product Price Identifier Function”
- Paste the above JavaScript snippet in this field and click on save. After this, you should be able to see the message on the product pages informing users of the points they will earn for the purchase of the product that is being viewed.
Step 4: Set up rewards in Zinrelo
Now configure the rewards for your loyalty program in Zinrelo admin console.
Integrated plugin features
| Requirement | Description | Availability |
|---|---|---|
| Member identifier customization | Is it possible to customize a member's email address with another member identifier, such as 'Customer ID,' 'GUID,' 'Phone Number,' or similar options? | No |
| Purchase Tracking | The Purchase tracking passes the data for each purchase to Zinrelo. This enables Zinrelo to award points for purchases. | Yes |
| Return Tracking | The Return tracking passes the data for each return to Zinrelo. These returns are correlated against an earlier corresponding purchase. This Returns Tracking enables Zinrelo to deduct points for returned purchases. | Yes |
Please Note:
These features are integrated through plugins. If you want to incorporate additional features into your cart beyond these, please reach out to your account manager.
Updated 3 months ago